Physical Address
304 North Cardinal St.
Dorchester Center, MA 02124
Physical Address
304 North Cardinal St.
Dorchester Center, MA 02124
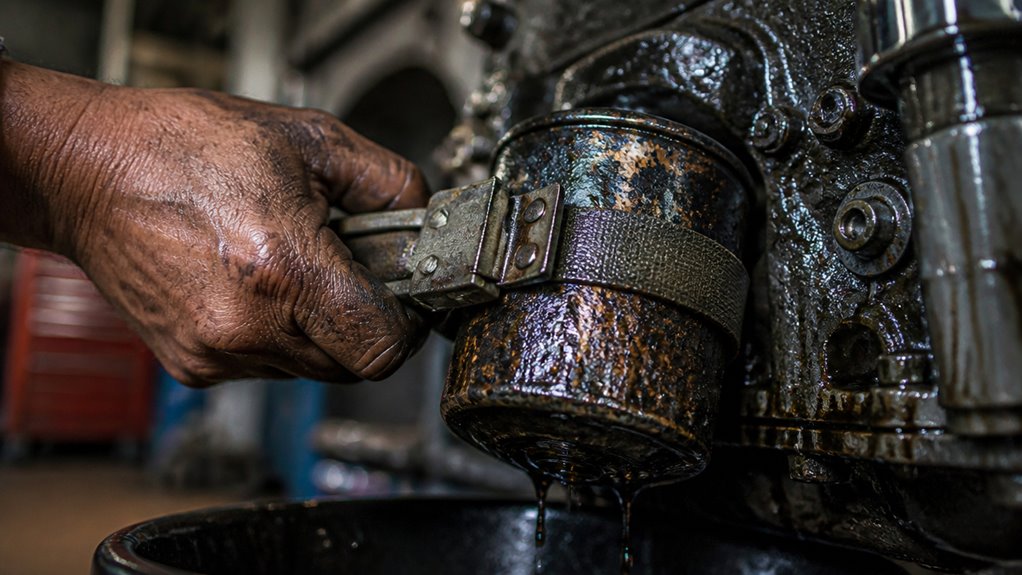
To get a stuck oil filter off, first make sure your engine is cool and use gloves for safety.
Spray penetrating oil around the base and wait several minutes.
Wrap medium-grit sandpaper around the filter to improve grip.
Then apply steady counterclockwise torque with an oil filter wrench or hose clamp and screwdriver lever for more leverage.
Avoid overtightening to prevent damage.
If these fail, the screwdriver and hammer method may be necessary.
Continue exploring to master removal and installation techniques.

Although oil filters are designed for easy removal during routine maintenance, they often get stuck due to factors like corrosion, overtightening, or accumulated grime.
Corrosion forms when moisture or contaminants react with metal surfaces, causing the filter to bond tightly to the engine mount.
Over-tightening during installation compresses the gasket excessively, increasing friction and making unscrewing difficult.
Grime buildup from oil leaks or dirt further locks the filter in place.
You can spot a stuck filter by resistance when turning it counterclockwise by hand or wrench, and by visible signs like rust or oil seepage around the base.
Early identification prevents damage to threads or gaskets.
Understanding these causes helps you select the proper removal technique and tools for efficient, safe filter extraction.
Regular maintenance checks, including oil filter tightness inspections, can help prevent filters from becoming stuck over time.
Before you start removing a stuck oil filter, make sure the engine has been off and cooled for at least 30 minutes to avoid severe burns from hot oil and metal parts.
Position your vehicle on a level surface and engage the parking brake to prevent any movement.
Wear protective gloves and safety goggles to shield your hands and eyes from hot fluids and debris.
Clear your work area of any tools or objects that might cause slips or distractions during the removal process.
Double-check that you have unobstructed access to the filter housing.
Taking these precautions minimizes injury risks and guarantees you can focus on removal without interruptions.
Proper preparation is essential to safely handle stubborn oil filters and avoid accidents during the procedure.
Using an appropriate oil filter remover tool designed for your filter type will help prevent damage and make removal easier.
Choose the right tools carefully to avoid damaging the oil filter or engine components during removal. Using improper tools can strip the filter’s surface or harm surrounding parts, complicating the process.
Careful tool selection prevents damage to oil filters and engine parts, ensuring a smoother removal process.
Start with specialized wrenches designed for oil filters to guarantee a firm grip and controlled torque. If those aren’t available, reliable alternatives can provide the needed leverage without risk.
Consider these options:
Selecting the proper tool upfront makes removal safer and more efficient. This reduces the chance of filter damage or injury. Proper tool selection also helps maintain vintage engine components in good condition during maintenance.
If you’re struggling with a stuck oil filter, here’s a handy trick: grab some sandpaper and wrap it around the filter, grit side facing out. If space is tight, don’t worry—just fold it a bit.
Next, spray some penetrating oil around the base of the filter. This will help break down any corrosion. Give it about 5 to 10 minutes to work its magic. For stubborn leaks, applying a penetrating oil sealant can improve your chances of loosening the filter without damage.
When an oil filter surface is oily or slippery, wrapping sandpaper around it can markedly improve your grip for removal. The abrasive texture increases friction, preventing slippage of your wrench or hands during twisting.
Use medium-grit sandpaper (around 80-120 grit) for an ideal balance between grip and durability. Fold the sandpaper once or twice to create a thicker, more secure layer if the filter gap is narrow.
This simple addition helps you apply strong, controlled torque without damaging the filter casing.
Wrap sandpaper grit side out around the filter circumference.
Fold sandpaper for a double layer in tight clearance areas.
Hold sandpaper firmly when using a wrench to avoid slipping.
Combine with mechanical leverage tools for stubborn filters.
This technique guarantees you maintain control while loosening stuck filters efficiently.
Avoiding pre-filling the oil filter also reduces the chance of introducing air pockets that can disrupt oil flow during installation.
Improving your grip with sandpaper sets the stage for applying penetrating oil, which targets corrosion and seizes at the filter base.
After wrapping sandpaper around the filter, spray penetrating oil evenly around its base where it meets the engine block.
Focus on the junction to maximize penetration into rusted or welded threads.
Use a type designed for automotive parts to guarantee proper chemical action on metal oxidation.
Avoid over-spraying to prevent excess oil dripping onto other engine components.
Penetrating oil reduces friction and breaks down rust, easing filter removal.
Apply a moderate amount to saturate the area thoroughly without flooding it.
This method enhances the likelihood of loosening a stuck oil filter without causing damage or requiring excessive force.
For best results, consider using penetrating oils with strong rust dissolving properties specifically formulated for automotive use.
Although applying sandpaper and penetrating oil sets the foundation for loosening a stuck oil filter, you need to allow sufficient waiting time for the oil to penetrate and break down corrosion effectively. Rushing removal increases the risk of damage or incomplete loosening.
Typically, waiting 5 to 10 minutes lets the penetrating oil seep into tight spaces and dissolve rust or grime. During this time, the sandpaper coating improves grip by removing surface oil and debris, preparing the filter for easier twisting.
Key points to bear in mind:
Using penetrating oils with low-viscosity formulas enhances deep penetration into tight spaces, improving the loosening process.
First things first, grab a hose clamp and slip it around your oil filter, but don’t tighten it just yet. You want to give yourself some wiggle room.
Now, take a screwdriver and slide it through the clamp’s band. This will help you create a solid lever for twisting.
As you start to turn the filter, gradually tighten the clamp. This way, you’ll keep a good grip and avoid any slippage when you’re trying to remove it. Easy peasy!
Remember, always replace your oil filter instead of reusing it to avoid filter media damage and ensure optimal engine performance.
Secure a sturdy hose clamp around the oil filter to enhance your grip during removal. Position the clamp near the filter’s base, guaranteeing it encircles the widest part.
Avoid fully tightening initially; leave some slack to adjust placement. This setup allows you to incrementally tighten the clamp as you apply torque, preventing slippage.
Use a flathead screwdriver through the clamp’s tightening mechanism to create a makeshift handle for better leverage.
Choose a durable hose clamp rated for high torque. Position the clamp to maximize contact without damaging the filter.
Leave slight looseness for repositioning before final tightening. Insert the screwdriver through the clamp screw for controlled turning.
Proper setup here guarantees a firm grip, reducing the risk of stripping the oil filter during removal.
For better performance and protection of components involved, consider applying high-temperature grease to the clamp’s contact points to reduce friction and wear during removal.
Apply steady counterclockwise force using a hose clamp tightened around the oil filter to improve grip and leverage.
Position the clamp so it encircles the filter without fully closing initially.
Insert a flathead screwdriver through the clamp’s band to create a handle, enhancing your turning leverage.
Gradually tighten the clamp as you apply torque, increasing friction between the clamp and filter surface.
This method prevents slipping when high rotational force is necessary.
Maintain firm control of the screwdriver handle to avoid sudden movements that could damage the filter or housing.
For best results, ensure you have a secure workspace to keep the oil filter stable during removal.
When you tighten the hose clamp around the oil filter, it’s important not to fully close it immediately to prevent slippage.
Instead, start by snugging it slightly. Then insert a screwdriver through the clamp to create a secure leverage point.
Gradually tighten the clamp while applying counterclockwise torque. This ensures the clamp bites firmly into the filter surface without slipping.
This method enhances your grip, allowing you to apply high twisting force safely and efficiently.
This approach prevents clamp slippage, giving you better control during removal.
If all other removal methods fail, you can resort to the screwdriver and hammer technique to free a stuck oil filter.
Punch a long flathead screwdriver firmly through the filter’s side, aiming crosswise to maximize leverage. Use a hammer to drive the screwdriver fully through the filter casing.
Once inserted, grip the screwdriver tightly and twist counterclockwise with steady pressure to unscrew the filter. This method provides strong mechanical advantage but risks oil spillage and filter deformation.
Avoid excessive force that could shear the filter and damage the engine’s threaded adapter. Use this approach only as a last resort after trying less invasive techniques.
Always wear protective gloves and eye gear to prevent injury from metal shards or hot oil during the process.
After using the screwdriver and hammer method, clean the oil filter housing thoroughly before attempting removal. Removing debris and oil residue helps prevent thread damage and guarantees smooth detachment.
Use a clean rag and a solvent suitable for oil residues to wipe the area. Carefully inspect the threads on both the engine adapter and the filter housing for any signs of wear, cross-threading, or damage.
Focus on these key steps:
Remove all old gasket remnants to avoid sealing issues. Clean oil and dirt from the housing threads to prevent cross-threading. Check for thread deformation or damage that could cause leaks. Use a flashlight for better visibility during inspection.
This careful cleaning and inspection step reduces the risk of further damage during removal.
Start by applying a thin, even layer of clean engine oil to the new filter’s rubber gasket before installation. This lubrication guarantees a proper seal and prevents the gasket from sticking to the engine block.
Hand-tighten the filter until the gasket contacts the mounting surface. Then turn it 3/4 to 1 full turn more. Avoid over-tightening to prevent damage and future seizing.
| Step | Action | Reason |
|---|---|---|
| Lubricate gasket | Apply thin oil layer | Guarantees seal and easy removal |
| Hand-tighten filter | Turn until gasket seats | Prevents cross-threading |
| Final tighten | 3/4 to 1 turn more | Seals without over-tightening |
| Inspect threads | Check for damage | Avoids leaks and sticking |
| Clean mounting area | Remove debris/oil | Ensures proper gasket contact |
Yes, a stuck oil filter can cause engine damage if you don’t remove it promptly. It restricts proper oil flow, leading to inadequate lubrication and increased engine wear.
Over time, this can cause overheating, component damage, or even engine seizure. You should address a stuck filter quickly to maintain oil circulation and protect your engine’s health.
Always inspect for leaks or gasket remnants after removal to verify a proper seal.
Driving with a leaking oil filter gasket is like inviting your engine to a slow-motion disaster party.
You’re risking oil loss, which can cause severe engine damage or even complete failure.
It’s not safe at all. You should stop immediately, inspect the gasket, and replace or reseat it properly.
Ignoring a leak risks overheating and expensive repairs.
Always prioritize fixing oil leaks to keep your engine running smoothly and reliably.
You should replace your oil filter every time you change your oil, typically every 3,000 to 7,500 miles depending on your vehicle and oil type.
Regular replacement prevents dirt buildup and corrosion that cause sticking. Sticking often occurs when filters remain in place too long, allowing gaskets to harden or seize.
Follow your manufacturer’s schedule strictly and always inspect the filter area during oil changes to avoid complications.
Picture trying to unscrew a rusty jar lid that just won’t budge. That’s what using the wrong oil filter brand feels like. Yes, it can increase sticking risk because mismatched threads or inferior gasket materials cause improper sealing and corrosion buildup.
You’ll face tougher removal and potential leaks. Always choose filters matching your engine specs to guarantee proper fit, reliable sealing, and easier future removal. This will save you time and frustration.
Yes, you can use synthetic oils with advanced anti-corrosion additives to reduce oil filter corrosion.
These oils maintain stable chemical properties under high temperatures, minimizing acid buildup that leads to rust.
Look for oils meeting API SN or higher standards with enhanced detergents and inhibitors.
Using high-quality oil extends filter life and prevents seizing.
Regular oil changes also help by removing contaminants that accelerate corrosion on oil filter surfaces.
Removing a stuck oil filter can feel like wrestling a stubborn grip, but with the right tools and techniques, it’s manageable.
Always prepare safely, use penetrating oil and sandpaper to loosen it, and consider a hose clamp for extra grip.
Avoid forcing it to prevent thread damage.
Clean thoroughly before installing your new filter, ensuring it’s properly seated to keep future removal smooth and hassle-free.
Consistency prevents stuck filters like clockwork.