Physical Address
304 North Cardinal St.
Dorchester Center, MA 02124
Physical Address
304 North Cardinal St.
Dorchester Center, MA 02124

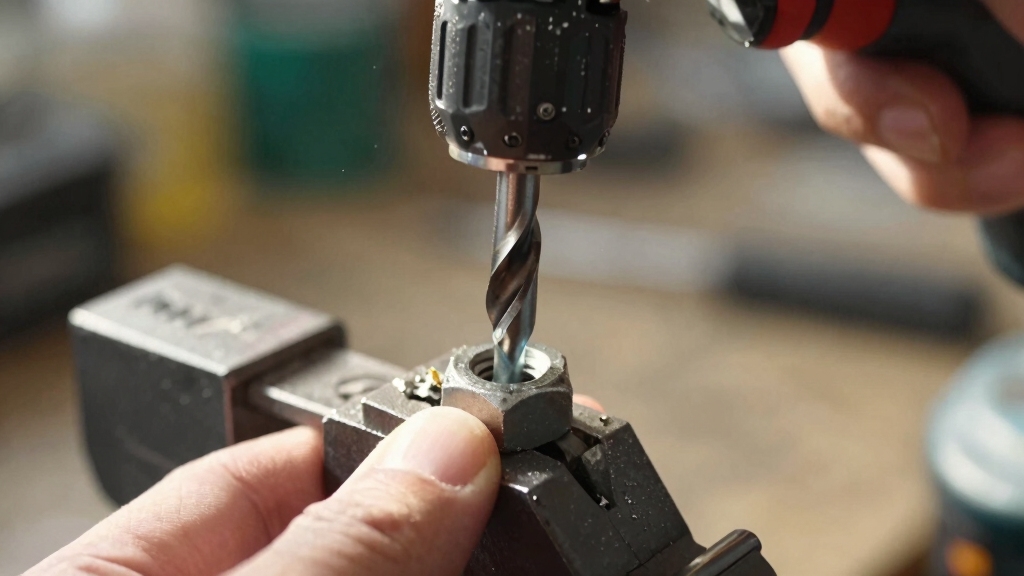
To remove a rivet nut, start by center-punching it for precise drilling. Use a sharp drill bit slightly smaller than the nut’s outer diameter at low speed to avoid damaging the hole.
Clear debris as you go, then grind remaining material carefully with a rotary tool if needed. Larger rivets may require an angle grinder for faster removal. For soft aluminum, flush-cutting snips work well.
Choosing the right tools and methods guarantees a clean extraction without harming surrounding materials. Explore further for detailed techniques.
When selecting a removal method for a rivet nut, you need to take into account factors like material type, rivet size, and surrounding components to avoid damage.
For instance, softer materials like aluminum call for manual methods such as flush-cutting snips, while steel rivets may require grinding or chiseling.
Consider rivet size: larger solid rivets respond well to angle grinders, offering speed but with higher risk to adjacent parts.
Smaller rivets suit drill bits or rotary tools for precision.
Also, evaluate access and tool availability; rotary tools provide controlled grinding, whereas step drill bits offer minimal material damage.
Your choice should balance efficiency with protection of the base material and neighboring components, ensuring safe, clean removal without compromising structural integrity.
Additionally, preparing a clean workspace is crucial to avoid contamination and ensure a smooth rivet nut removal process.
Although drilling out a rivet nut requires careful attention, you can guarantee damage to the surrounding material by using a sharp drill bit centered precisely on the rivet nut and maintaining a low drill speed for controlled progress.
Position your drill perpendicular to the surface and drill slowly through the rivet head to avoid spinning. If spinning occurs without breaking, apply a slight tilt to the drill.
After removing the head, clear debris with the drill bit or compressed air.
| Step | Action |
|---|---|
| Drill Bit Position | Centered, perpendicular |
| Drill Speed | Low, controlled |
| Drilling Technique | Slow, steady pressure |
| Debris Removal | Drill bit or compressed air |
This method guarantees precise removal without harming nearby material.
After carefully drilling out the rivet nut head to minimize damage, you can use rotary tools to grind away any remaining material efficiently.
Using a fiberglass-reinforced cutting disc or carbide burrs on your rotary tool allows precise removal without harming the surrounding surface.
Follow these steps:
This method offers controlled, effective removal, minimizing damage and preparing the hole for new fasteners. Applying proper procedures during this process ensures the best results and prevents damage to surrounding components.
When it comes to removing rivet nuts quickly, an angle grinder can be your best friend, especially if you’re dealing with larger solid rivets.
It really speeds up the process!
Just remember to keep your grinding steady and controlled; you don’t want to accidentally damage any nearby components while you’re at it.
And hey, safety first!
Always put on the right gear to protect yourself from those sparks and debris flying around during the removal.
It’s better to be safe than sorry, right?
Also, just like addressing a gearbox oil leak, taking immediate and careful action can prevent further damage to your equipment, so identify the leaking area promptly if you notice any issues.
Frequently, using an angle grinder provides the fastest method for removing rivet nuts, especially larger solid ones that demand speed and power. You’ll find this approach excels when time is critical and the rivet nut is robust.
Consider these speed advantages:
However, it is important to exercise caution during removal to avoid damage to surrounding materials and ensure safety.
Leveraging an angle grinder’s speed to remove rivet nuts demands strict adherence to safety precautions to prevent injury and damage. Always wear eye protection and gloves to shield against sparks and metal shards.
Make certain the workspace is clear of flammable materials and bystanders. Use a center punch to mark the rivet nut, providing a guide for controlled grinding. Maintain a steady hand to avoid damaging surrounding components.
Understanding the importance of pressure release valves in high-pressure tools highlights the need for controlled pressure management even in manual metal removal tasks.
| Safety Aspect | Recommended Action |
|---|---|
| Personal Protection | Use goggles, gloves, ear plugs |
| Workspace Setup | Clear area, remove flammables |
| Tool Handling | Mark rivet, steady grinding motion |
Following these precautions makes certain efficient removal without compromising safety or the integrity of adjacent materials.
When removing rivet nuts, step drill bits come in handy by allowing you to enlarge the hole gradually without damaging the surrounding material. This method guarantees precision and minimizes material loss.
To do this effectively:
Using a step drill bit is a controlled, efficient way to remove rivet nuts while preserving the integrity of your workpiece.
Cut small aluminum rivets efficiently by using flush-cutting snips designed specifically for this purpose.
Begin by positioning the snips so the beveled cutting edge aligns flush with the rivet head. Apply steady pressure to guarantee a clean cut through the hollow aluminum shaft without deforming surrounding material.
Position snips flush with the rivet head and apply steady pressure for a clean, deformation-free cut.
Avoid classic diagonal wire cutters, as their bevel design won’t provide the necessary flush cut and may damage the workpiece. Expect occasional tool wear or breakage, but replacement remains low-cost.
This manual method requires no power tools or heat, making it ideal for delicate assemblies. Work methodically, cutting incrementally if needed, until the rivet head is fully severed.
Once cut, you can easily remove the remaining rivet shaft by hand or with pliers, guaranteeing minimal damage to the original hole. To prevent complications similar to an over-tightened oil plug, always ensure proper tool use and avoid excessive force during removal.
You generally can’t reuse rivet nuts after removal because the deformation from installation compromises their grip and structural integrity.
Once you drill out or grind off the rivet nut, it loses the precise shape needed to secure materials effectively.
To guarantee reliable fastening, you should replace rivet nuts with new ones matching the original specifications.
Reusing them risks poor thread engagement and potential failure under load or vibration.
You must wear safety glasses or goggles to protect your eyes from flying debris and metal shavings.
Gloves are essential to shield your hands from sharp edges and heat generated during grinding or drilling.
Use ear protection like earmuffs or plugs to guard against loud noises from power tools.
Additionally, wear a dust mask or respirator to avoid inhaling metal dust, especially when grinding or drilling rivet nuts.
Make certain proper ventilation in your workspace.
To prevent damage to painted surfaces, you should first apply masking tape around the rivet nut to protect the finish.
Use low-speed drilling or precise rotary tools to minimize heat and vibration.
Keep tools steady and avoid slipping by securing the workpiece firmly.
If grinding, use light pressure and avoid contact with surrounding paint.
Always work methodically and inspect frequently to make certain the paint remains intact throughout removal.
Oh, you want to perform microsurgery with power tools? In tight spaces, grab a Dremel with a fiberglass-reinforced cutting disc or carbide burrs. They offer precision without the chaos.
Step drill bits also work wonders, letting you carefully enlarge holes without damage. Forget angle grinders; they’re bulky beasts.
For tiny aluminum rivets, flush-cutting snips are your manual scalpel. Use these tools methodically to remove rivet nuts cleanly, even where space is minimal.
To identify the size of a rivet nut before removal, measure the outer diameter of the flange and the body using calipers.
Check the length by comparing it to a ruler or depth gauge.
Note the thread size by examining the internal threading with a thread pitch gauge or matching it to a known bolt.
This precise measurement guarantees you select the correct replacement or removal tools without damaging the material.
Removing a rivet nut is like carefully extracting a stubborn gear from a well-oiled machine. Precision matters. Just as a mechanic wouldn’t force a part and risk damage, you shouldn’t rush the removal process.
Whether you drill, grind, or cut, choosing the right method preserves your material’s integrity.
Remember, a steady hand and the proper tool can turn a potentially destructive task into a smooth, efficient operation every time.