Physical Address
304 North Cardinal St.
Dorchester Center, MA 02124
Physical Address
304 North Cardinal St.
Dorchester Center, MA 02124
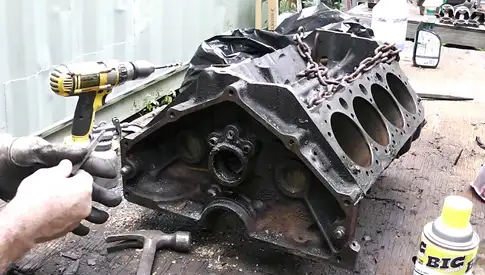
Removing oil galley plugs from an engine block is a necessary step in vehicle engine maintenance and restoration. These seemingly innocuous plugs can present a range of challenges, from stubborn rust and corrosion to the need for specialized tools and techniques.
The oil galley plugs can be located behind the distributor or along the engine’s sides. Prepare yourself and the engine for the removal process, considering safety precautions.
Select the right tool for the job to ensure a successful extraction. Heat the plugs to loosen them, and cool them with lubricants to facilitate their removal.
Throughout this article, we’ll guide you through the process of safely removing these oil galley plugs. From facing the challenges head-on to using penetrating oil for added ease, we’ll equip you with all the necessary knowledge.
Oil galley plugs can be a challenge to remove, but careful consideration and the right tools make it easier. To remove oil galley plugs from your vehicle engine, follow a series of steps.
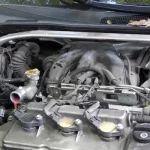
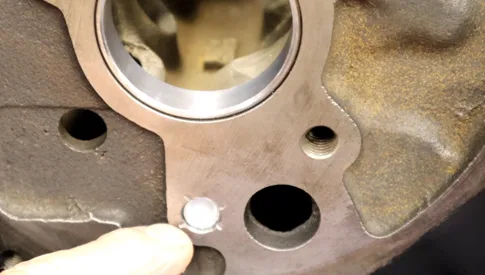
To assess the location of the oil galley plugs on your vehicle engine, carefully examine the positions along the sides or behind the distributor. These plugs are crucial for maintaining proper oil flow and preventing leaks in the engine block.
Start by locating the distributor, typically near the top of the engine. Behind it, you may find one or more oil galley plugs. Additionally, inspect the sides of the engine block, as some vehicles have galley plugs located there as well.
Take note of the specific positions of these plugs, as they may differ depending on the make and model of your vehicle. Once you have identified the location, you can proceed to the next step of removing the oil galley plugs.
Before you begin removing the oil galley plugs from your vehicle engine, gather the necessary tools and materials and take the necessary safety precautions.
When removing oil galley plugs from your vehicle’s engine, you’ll need to select the appropriate tool for the job. The choice of tool depends on the location and design of the plugs.
Choose the tool that matches your plug design to ensure a successful removal process.
Heat the oil galley plugs using a propane torch to aid in their removal from your vehicle engine. This step is crucial when dealing with stubborn plugs that are difficult to remove.
By applying heat evenly to the plugs, you can make the removal process much easier. Start by using a propane torch and carefully direct the flame toward the plugs. Make sure to heat them until they turn cherry red.
This heat will cause the plugs to expand, helping to break the rust and loosen them from their position. However, it’s important to exercise caution and take fire safety measures when using a torch. Always keep a fire extinguisher nearby in case of emergencies.
After heating the plugs and expanding them to break the rust, you can now cool them with lubricants to further facilitate the removal process. Once the plugs have cooled slightly, apply a generous amount of WD40 to the threads. The purpose of this step is twofold.
First, the lubricant will help to loosen any remaining rust that may still be clinging to the threads. This will make it easier to unscrew the plugs from the engine.
Second, the lubrication provided by WD40 will reduce friction between the threads and the surrounding metal, making it smoother and more effortless to turn the plugs.
Now start the actual process of removing the plugs.
Use your Allen Wrench to slowly and steadily unscrew the plugs. You can also use specialized socket sets or pipe plug sockets to fit the plugs snugly. Apply firm but controlled pressure in a counterclockwise direction. Turn the plugs slowly and steadily to prevent damage to the threads.
This minimizes the risk of stripping or breaking the plugs. By maintaining a steady pace and being patient, you can effectively remove the oil galley plugs without any complications.
Some vehicle mechanics suggest that, in certain cases, tightening the plugs slightly before attempting removal can help break them loose. If you try this method, be gentle and ensure you don’t over-tighten.
To avoid over-tightening, gently tighten the oil galley plugs in a clockwise direction before attempting removal. The goal is to create a small amount of tension that can help break the plug free.
Remember to be cautious and avoid over-tightening, as this can lead to stripped threads or other complications. Once you have gently tightened the plug, you can proceed with attempting to remove it following the above steps.
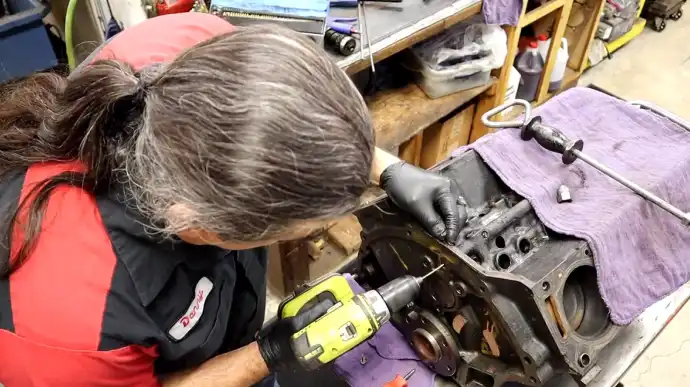
If the plugs still won’t budge after following the above steps, a reverse drill bit can be used to make a groove for a screwdriver. Just be careful not to damage your engine.
The reverse drill bit is designed to rotate in the opposite direction of a regular drill bit, which can help loosen stubborn plugs. Insert the reverse drill bit into the center of the plug and slowly drill in a counterclockwise motion. As the bit rotates, it may catch onto the plug and start to loosen it.
Alternatively, you can carefully drill into the plug using a regular drill bit. Create a shallow groove in the plug and then insert a screwdriver into the groove to turn and remove the plug. Take your time and exercise caution to prevent any damage to your engine block.
When removing oil galley plugs from your vehicle engine, you may face several challenges.
To disassemble your vehicle’s oil galley plugs, you may face the challenge of stubborn rust and corrosion. Over time, these plugs can become tightly fused to the engine block, making it difficult to break the bond, especially if they’ve been in place for a long time.
Rust and corrosion occur when metal is exposed to moisture and oxygen, causing a chemical reaction that weakens the plug’s connection to the engine block. The presence of rust and corrosion can make it harder to loosen and remove the plugs, requiring additional force and specialized tools.
The plugs are often located in tight or hard-to-reach spaces within the engine block, making it difficult to apply the necessary force and tools for removal.
This limited access can be caused by various factors, such as the engine layout or the presence of other components obstructing the plug’s access. In some cases, you may need to remove surrounding components or use specialized tools to reach and remove the oil galley plugs.
Additionally, the limited space may restrict the range of motion, making it hard to position tools properly and apply the required torque.
Removing oil galley plugs from your vehicle engine can present challenges due to the different types of plugs that may be used.
One type of plug commonly found is the square-hole plug. These plugs have a square recess in the center, requiring a special tool known as a square-head socket to remove them.
Another type is the pressed-in plug, which is pressed into the engine block. To remove these plugs, you’ll need to use a punch or a pry tool to carefully dislodge them.
Lastly, threaded plugs are another common type. These plugs have threads that screw into the engine block, and they can be removed using a wrench or socket.
In some cases, the oil galley plugs removal process may require disassembling other engine components in the vehicle, such as the front clip and oil filter. This adds complexity to the job and may require additional tools and time.
Removing the front clip involves disconnecting various electrical connectors, hoses, and bolts that secure it to the vehicle’s frame. It’s important to exercise caution and follow proper procedures to avoid damaging any surrounding components.
Additionally, removing the front clip may require the use of specialized equipment or assistance from another person to safely lift and support the weight.
To successfully remove oil galley plugs from your vehicle engine, you may encounter a tedious and time-consuming process. The challenges arise due to the intricate nature of the plugs and the need for meticulousness during removal.
One of the time-consuming aspects is locating the plugs, as they’re often hidden in hard-to-reach areas of the engine. Additionally, the plugs can become stubbornly stuck, requiring careful maneuvering and application of force to loosen them.
Furthermore, removing the plugs can be a slow process because of the need to clean the surrounding area thoroughly to prevent any debris from falling into the engine.
You can use penetrating oil to remove the oil galley plugs from your vehicle engine. Penetrating oil is designed to break down rust and corrosion, making it easier to loosen stubborn plugs.
When applying penetrating oil, it’s important to ensure that the oil reaches the threads of the plugs. You can do this by using a small brush or by soaking a cloth in the oil and applying it directly to the plug.
Allow the oil to sit for a few hours or overnight, giving it time to penetrate the rust and corrosion. Afterward, you can use a wrench or socket to carefully loosen and remove the oil galley plugs.
Consider seeking professional assistance if you struggle to remove stubborn oil galley plugs from your vehicle engine. Removing these plugs can be a complex task that requires specialized tools and expertise.
Professionals have the knowledge and experience to handle challenging situations and can prevent costly mistakes that could damage your engine. They also have access to advanced equipment that can aid removal.
A mechanic or machine shop will have the necessary tools, such as heat guns or impact wrenches, to apply the right amount of force without causing any harm.
Removing oil galley plugs may be a demanding task, but it is a critical component of ensuring the health and longevity of an engine. While the challenges can be formidable, following the proper procedures, using the right tools, and maintaining a patient and cautious approach can lead to successful plug removal.
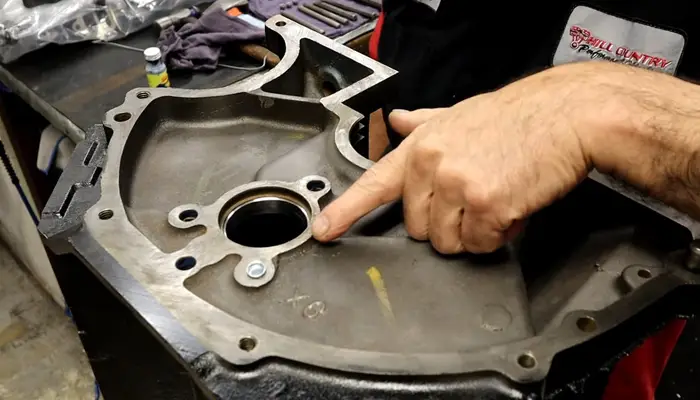
Do not forget to mark the engine block for identification purposes, and if you encounter significant difficulties, do not hesitate to seek professional assistance.
By mastering the art of oil galley plug removal, you contribute to the efficient maintenance and restoration of your engine, guaranteeing its optimal performance for years to come.