Physical Address
304 North Cardinal St.
Dorchester Center, MA 02124
Physical Address
304 North Cardinal St.
Dorchester Center, MA 02124
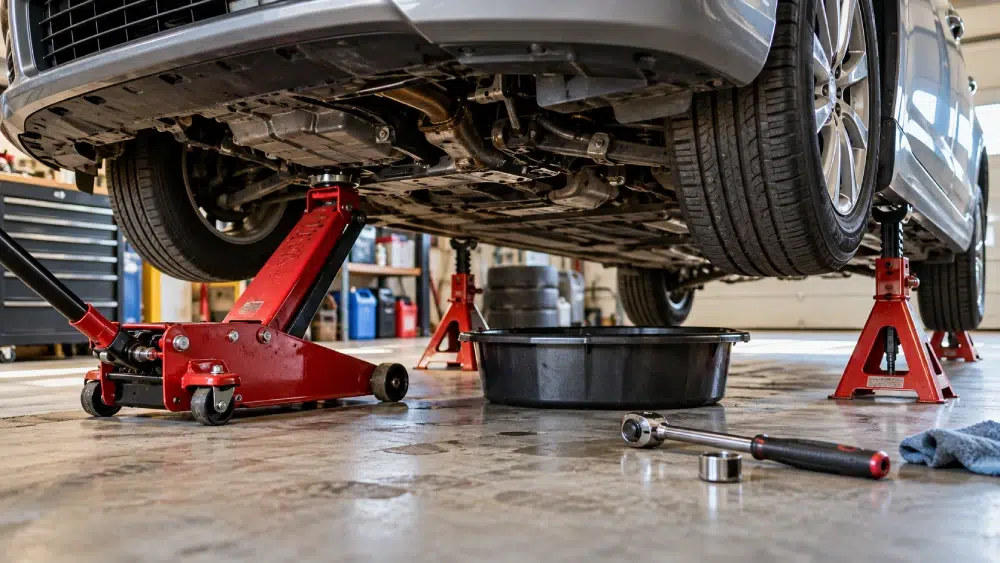
To raise your car for an oil change, start by securing it on a flat, hard surface and engaging the parking brake.
Locate the manufacturer’s designated lift points from the owner’s manual and position a properly rated floor jack squarely beneath one.
Lift slowly and steadily, then place jack stands under solid support points before lowering the vehicle carefully onto them.
Double-check stability with a gentle shake before working underneath.
Following these steps guarantees safety and sets you up for efficient servicing and proper completion.

Locate the designated jack points on your vehicle before lifting it. Consult your owner’s manual to find exact locations, as they vary by model.
Always locate your vehicle’s designated jack points before lifting, referring to the owner’s manual for precise locations.
Focus on strong structural components like the frame, subframe, axle, or factory pinch-welds. Avoid sheet metal or weak body panels; these won’t support the vehicle’s weight and may cause damage or slipping.
Position the jack so its saddle aligns precisely with these reinforced points to guarantee stability. Centering the load on the jack saddle is critical; misalignment can lead to jack displacement.
Confirm these points visually and by feel if necessary. Using incorrect spots increases the risk of accidents or damage, so identifying and using the right jack points is essential for a safe and effective vehicle lift during your oil change.
For low-clearance vehicles, consider using a low-profile jack to ensure proper access and lift height without damaging the undercarriage.
To get started, find a nice flat spot on hard ground. This helps reduce the chances of your jack or stands moving around while you work.
Next, make sure to fully engage your parking brake. This is super important to keep your vehicle from rolling when you start lifting it up.
And don’t forget about wheel chocks! Placing them on the wheels that stay on the ground adds an extra layer of stability.
It’s all about creating a safe work area, so take your time with these steps!
For added safety, consider using ramps with non-slip surfaces to prevent slipping during your oil change.
When preparing to raise your car for an oil change, always choose a flat, hard surface to guarantee stability.
Avoid gravel, grass, or uneven terrain, as these surfaces increase the risk of jack slippage or jack stand movement.
Concrete or asphalt driveways are ideal because they provide a solid, level foundation for lifting equipment.
Make sure the area is free from debris or loose materials that could affect jack placement.
Confirm the surface can support your vehicle’s weight without settling or shifting.
Position your jack and jack stands squarely on this stable ground to maintain balance during the lift.
Taking these precautions assures safety and prevents accidents while you work underneath your vehicle.
Using a low-profile design oil drain pan can also help reduce spills and ease fluid collection in tight spaces during the oil change.
You should always engage the parking brake fully before lifting your vehicle to prevent any unintended movement. This step is essential to maintain vehicle stability on your chosen flat, hard surface. Engaging the parking brake locks the rear wheels or front, depending on your vehicle, and reduces the risk of roll.
Keep these points in mind when engaging the parking brake:
For added safety, always perform lifts on a level, stable surface to prevent delays or complications during service.
To secure your vehicle effectively, place wheel chocks on the wheels that remain in contact with the ground. This prevents any unintended rolling while you lift the car.
Use heavy-duty chocks designed for automotive use, positioning them snugly against the tire tread. If you’re lifting the front, chock the rear wheels; if lifting the rear, chock the front wheels.
Make sure the chocks sit on a flat, stable surface to maximize grip. Avoid soft or uneven ground, which can cause chocks to shift.
Always engage the parking brake before placing chocks. After setting the chocks, test their stability by attempting to gently push the vehicle forward and backward.
Proper use of wheel chocks greatly lowers the risk of accidents during the oil change process. Additionally, using a stable lifting platform such as a floor jack rated for your vehicle’s weight improves overall safety when raising the car.
Select lifting equipment rated to handle your vehicle’s weight, ensuring both the floor jack and jack stands meet or exceed the load requirements. Using undersized or inadequate equipment risks collapse and injury.
When choosing your jack and stands, consider these key points:
Confirm load capacity matches or exceeds your vehicle’s Gross Vehicle Weight Rating (GVWR). Opt for a hydraulic floor jack for smooth, controlled lifting.
Assure jack stands have adjustable heights to fit your vehicle’s clearance needs. Select stands with wide, stable bases to prevent tipping.
Avoid makeshift supports like concrete blocks; use certified equipment only. Properly rated and stable lifting tools provide a secure foundation.
This ensures you can safely proceed with your oil change without risking vehicle shifts or accidents. For enhanced safety, choose a jack with built-in overload protection valves to prevent lifting beyond capacity.
Place the floor jack squarely beneath the designated lift point, ensuring it aligns precisely with the vehicle’s structural support.
Consult your owner’s manual to identify the exact jack points, typically located on the frame, subframe, or pinch-weld areas.
Avoid placing the jack on weak sheet metal or body panels, as these won’t support the load.
Position the jack saddle centered under the lift point to distribute weight evenly and prevent slipping.
Confirm the jack base rests on a flat, stable surface; uneven ground increases the risk of jack instability.
Before proceeding, double-check that the jack is perpendicular to the load direction, ensuring a vertical lift.
Proper alignment here is critical to maintain control and safety throughout the lifting process.
Using the correct type of fluid, such as brake fluid or power steering fluid, is essential to maintain the safety and functionality of vehicle systems during maintenance.
When lifting the vehicle, take your time and go slow. You’ll want to operate the jack handle with controlled, steady pressure.
This way, you avoid any sudden movements that might shift the car off its lift points.
It’s really important to keep the jack centered too. That helps maintain stability while you’re raising the vehicle.
Just remember, patience is key here! Using a jack with self-locking safety features can further ensure stability during the lift.
Begin lifting the vehicle by positioning the jack squarely under the designated lift point, assuring it sits at a right angle to the load. Lift the vehicle slowly to maintain control and prevent sudden shifts.
Keep the jack centered and aligned vertically to avoid uneven pressure or slipping. Raise the vehicle only high enough for jack stand placement.
Monitor the vehicle for any lateral movement during lifting. Use steady, gradual pumping of the jack handle.
Avoid rapid or jerky motions that may destabilize the load. Pause occasionally to confirm the jack’s position and stability.
Controlled, slow lifting assures safety and proper load distribution, minimizing risks during your oil change preparation. For best results, use a jack with a built-in safety valve to prevent overloading and ensure secure lifting.
Maintaining control during the initial lift reduces the risk of unexpected vehicle movement. When you raise the vehicle, do it slowly and steadily. Sudden or rapid lifting can cause the car to shift or slip off the jack.
Keep the jack saddle centered under the correct lift point and watch for any sideways motion. If the vehicle starts to move, lower it immediately and reposition.
| Step | Action |
|---|---|
| 1 | Position jack under lift point |
| 2 | Engage parking brake |
| 3 | Lift slowly and steadily |
| 4 | Monitor for any shifting |
Take your time during lifting. This precision guarantees safety and prevents damage to your vehicle or equipment. Avoid using an impact wrench during maintenance as it can cause damage to threads and reduce control.
Secure placement of jack stands is critical for your safety when working under a raised vehicle. You must position the stands under solid structural points like the frame or subframe, not on weak body panels or sheet metal.
Before lowering the car, adjust the stands close to the vehicle’s height for minimal drop. Confirm the stands’ load rating matches or exceeds your vehicle’s weight.
Keep these points in mind when placing jack stands:
This precise placement prevents slippage and secures the car for safe under-vehicle access.
Alright, let’s get into it. First off, make sure you line up those jack stands just right under the designated support points. This step is super important, so take your time!
Once you’ve got them in place, start lowering the car slowly and evenly. You want to transfer the weight onto the stands smoothly—no sudden shifts, okay?
After the vehicle is resting on the stands, it’s a good idea to do a quick stability check. Just give the car a gentle shake to make sure everything is secure. Better safe than sorry!
Lower the vehicle slowly until the jack stands bear the full weight. Ensure you’ve positioned them under solid chassis or frame points.
Proper alignment is critical to prevent vehicle slips or damage. Adjust the stand height closely before lowering to minimize drop distance.
Make sure each stand contacts a structurally sound area, avoiding weak panels or suspension components. Once the vehicle rests on the stands, never rely on the jack alone.
Position stands symmetrically on each side for balanced support. Confirm contact points match manufacturer’s recommended lift areas.
Adjust stand height precisely to avoid excessive lowering. Lower the vehicle gently to transfer weight gradually.
Perform a firm shake test to verify stability before working underneath.
Always proceed cautiously when lowering the vehicle onto the jack stands to guarantee the load transfers gradually and evenly.
Begin by slowly turning the jack’s release valve to lower the vehicle at a controlled pace.
Make sure the vehicle descends straight onto each jack stand without shifting or tilting.
Maintain your focus on the contact points, confirming the stands accept the weight incrementally.
Avoid sudden drops or rapid lowering, which can cause instability or damage.
Once the vehicle rests fully on the stands, stop lowering and verify the jack is no longer bearing any load before removing it.
This careful approach minimizes risk and makes certain the vehicle remains securely supported, setting the stage for safe maintenance beneath the car.
Regularly double-checking the vehicle’s stability after setting it on jack stands is essential before you begin any work underneath.
Lower the vehicle slowly until the stands fully support the load, then release the jack carefully. Never rely solely on the jack as your support.
Perform a shake test by gently pushing the car to guarantee it’s firmly seated on the stands.
To confirm stability:
Following these steps minimizes risk and guarantees a safe working environment.
Before you crawl under the vehicle, you should firmly shake it to verify that it’s securely supported by the jack stands.
Always shake the vehicle firmly to ensure it’s securely supported by the jack stands before going underneath.
Grasp the vehicle’s frame or suspension components and apply moderate force in multiple directions: side to side and front to back.
Observe any movement or instability; the car must remain steady without rocking or shifting. If you detect any wobble, lower the vehicle, reposition the stands, and lift again to guarantee proper seating.
Confirm the jack stands rest on solid structural points, not on weak panels or uneven surfaces. Never rely on the hydraulic jack alone for support during this test.
Performing this stability check minimizes the risk of accidents and guarantees a safe working environment beneath the vehicle during your oil change.
Once your oil change is complete and you’ve confirmed no tools or parts remain beneath the vehicle, you can begin removing the jack stands.
First, raise the vehicle slightly with the jack to take the weight off the stands. This prevents sudden shifts or damage when removing the supports.
Then, carefully lower the jack stands and remove them from under the vehicle. Follow these steps for safe removal:
Make sure the jack is stable and centered under the lift point.
Lift the vehicle just enough to free the jack stands.
Remove stands one at a time, starting from the front or whichever side is safest.
Keep hands and feet clear when lowering stands.
Double-check that the vehicle remains stable on the jack before lowering further.
Lowering the vehicle gradually guarantees a controlled descent that prevents sudden shifts or damage.
Begin by slightly raising the jack to relieve weight from the jack stands. Then remove the stands cautiously.
Make sure the jack is properly centered under the lifting point before you start lowering.
Lower the vehicle slowly and steadily, monitoring for any unexpected movement or instability.
Once the vehicle rests fully on the ground, remove the jack carefully.
Confirm all tools, rags, and equipment are clear from under and around the vehicle to avoid damage or injury.
Finally, disengage the parking brake and wheel chocks only after the car is stable on the ground.
Clearing the work area promptly maintains safety and prepares you for future maintenance tasks.
You should change your engine oil every 3,000 to 5,000 miles or every 3 to 6 months, depending on your vehicle’s make, model, and driving conditions.
Always consult your owner’s manual for manufacturer recommendations. Severe driving conditions like frequent short trips, extreme temperatures, or heavy towing may require more frequent changes.
Regular oil changes maintain engine performance and prevent wear, so stick to the advised schedule for peak engine health.
Choosing the best oil isn’t about the thickest or the thinnest. It’s about what your engine demands.
Check your owner’s manual for recommended viscosity (like 5W-30) and oil type (synthetic or conventional).
Synthetic oils offer superior protection and performance, especially in extreme temperatures. Conventional oils suffice for standard use.
Always pick oils meeting API or ACEA standards. Using the right oil guarantees peak lubrication, efficiency, and engine longevity.
You shouldn’t reuse old oil filters. Once an oil filter has been used, it’s contaminated with debris and loses its filtering efficiency.
Reusing it risks clogging, reduced oil flow, and potential engine damage. Always replace the oil filter with a new, manufacturer-recommended one during each oil change to maintain proper engine protection and performance.
Proper disposal of the old filter is also important to prevent environmental harm.
Did you know one gallon of used motor oil can contaminate one million gallons of water?
To dispose of it properly, collect the oil in a clean, leak-proof container with a secure lid.
Never mix it with other fluids.
Take it to a certified recycling center, auto parts store, or hazardous waste facility.
Follow local regulations strictly to avoid environmental harm and legal issues.
Always keep records of your disposal method.
You’ll know your oil needs changing sooner if you notice dark, dirty oil on the dipstick or a burnt smell.
Engine noise or knocking can indicate degraded lubrication.
Check for oil level drops between changes, as leaks or consumption may require earlier service.
If you drive in extreme conditions, like frequent short trips, heavy traffic, or dusty environments, your oil degrades faster, signaling you should change it ahead of schedule.
Now that you’ve mastered raising your car safely for an oil change, you’re set to work like a pro. No need for a horse-drawn carriage to haul you around the garage!
Always double-check jack points and confirm stability before sliding underneath.
Take your time lowering the vehicle and clearing the area to avoid accidents.
Following these precise steps keeps your workspace safe and your vehicle secure, making your maintenance efficient and worry-free every time.