Physical Address
304 North Cardinal St.
Dorchester Center, MA 02124
Physical Address
304 North Cardinal St.
Dorchester Center, MA 02124

Before connecting your oil pressure gauge, fully isolate and depressurize the engine’s oil system using Lockout/Tagout procedures for safety.
Remove the OEM sender with the correct socket, install the proper adapter with thread sealant, then attach the sensor and route the nylon pressure line secured with compression fittings.
Wire the gauge’s ignition and sender terminals to a fused 12V source and ground properly. Finally, test for leaks and mount the gauge securely. Detailed steps will guarantee accurate installation and reliable readings.

Before you begin installing an oil pressure gauge, make sure to fully isolate and depressurize the system using Lockout/Tagout (LOTO) procedures to prevent accidental startup and guarantee your safety.
Always isolate and depressurize the system with LOTO before installing an oil pressure gauge for safety.
Confirm the LOTO tag is properly applied and verify zero pressure via the existing gauge or bleed valve. Disconnect the power supply to related equipment to avoid electrical hazards.
Slowly release the pressure medium to prevent sudden discharge injury, and drain fluid below the warning light sender location. Open the compensation valve on the gauge case to vent internal pressure from shipment, then close it to avoid ingress. It is also important to clean around the valve to prevent debris contamination during installation.
Always wear the required personal protective equipment, keep a suitable fire extinguisher nearby, and make certain tools are dedicated and oil-free for oxygen gauges. Verify complete isolation before proceeding. Apply physical locks on valve handles to prevent accidental reactivation during the installation process.
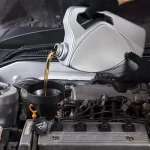
Gathering the right tools and materials sets the foundation for a successful oil pressure gauge installation. You’ll need a wrench set with SAE and metric sizes, channel lock pliers for switch removal, pipe wrenches for thread handling, and wire cutters and crimpers for electrical connections.
Include a 22mm wrench specifically for sensor tightening. For sealing, have Teflon tape (wrap 2-3 times clockwise), Teflon putty or pipe dope rated for oil pressure, and a wire brush for cleaning threads. Proper safety gear such as gloves and eye protection should also be used to prevent exposure during installation.
Secure proper fittings: 1/8 NPT oil pressure switch, brass tee fitting, Autometer #2269 adapter, and appropriate hose adapters. Use copper hose kits or plastic lines for gauge connections. It is recommended to buy higher-quality gear such as Autometer brand parts if local parts are unavailable to ensure reliability.
For wiring, prepare red and black #12 or #14 AWG wire with female spade connectors, zip ties, a mounting bracket, and a grommet for firewall routing to protect wires and maintain vehicle safety.
Alright, let’s dive into preparing the gauge mounting location. First things first, you want to pick a spot that’s easy to see from where you sit while driving. It’s super important that it doesn’t block any of your controls. Make sure to consider visibility and accessibility to ensure safe monitoring while driving.
Once you’ve found that perfect spot, grab your tools. You’ll need to measure and then drill a precise 2-1/16-inch hole right in the dashboard or gauge pod. Just make sure there aren’t any wires or hoses lurking behind that could get in the way.
Also, remember that for panel mounting, the gauge may be installed into the panel, against the surface, or directly to rigid pipe, depending on your setup and preference installation options.
Finally, once that hole is ready, it’s time to secure the gauge. Use the backclamp to hold it firmly in place. This will keep everything stable while you’re cruising around.
When measuring the dashboard hole for your oil pressure gauge, you’ll need to make certain the diameter matches the gauge size precisely.
Typically, this is 2-1/16 inches for 52mm gauges and 2-5/8 inches for larger 65mm models. Use accurate measuring tools to confirm the hole size before cutting. Proper fitment is crucial to ensure accurate oil pressure readings and prevent gauge malfunction.
Assure clearance around the hole accommodates the mounting bracket and the gauge’s minimum depth—at least 50mm, or 55mm including the bezel for 52mm models. Assess space for bracket legs, especially on contoured surfaces, avoiding interference from metal parts or wiring.
Before cutting or drilling, always disconnect the battery to ensure safety and prevent electrical shorts. This is a key step in preparing for the install.
When cutting, protect wires and hoses by mapping their location and using the proper drill size. Drill cleanly without enlarging the hole, enabling secure bolt alignment for mounting.
To make certain accurate oil pressure readings, position your gauge at the same height as the measurement point, aligning their centerlines carefully. This alignment guarantees the gauge experiences identical system pressure, critical for precision monitoring. When same-height installation is not possible, apply corrections to account for the height difference and ensure accuracy.
Mount the gauge vertically to minimize gravitational effects; avoid upside-down or angled installations unless you plan calibration adjustments.
Choose a location that provides clear visibility from the driver’s seat and allows easy access for maintenance without obstructing vehicle controls. Regular maintenance checks are essential to ensure the gauge remains securely mounted and functions properly.
Route tubing through the firewall with protective loops, shielding it from sharp edges. Select an area free from excessive vibration, mechanical interference, and extreme temperatures to maintain stable readings.
For most vehicles, mounting on the dashboard top or a dedicated pod using standard 52mm or 65mm holes facilitates secure, accessible installation tailored to your vehicle’s layout.
After selecting and positioning your oil pressure gauge for peak accuracy and accessibility, focus on securing the backclamp to prepare the mounting location.
Start by positioning the mounting bracket over the gauge’s rear studs, then slide the retention plate behind the gauge face.
Align the bracket holes with your rocker box or panel, and insert the screws through the bracket into these mounting points. Ensure that the power lead is connected to a switched 12V source fused and active with the ignition to protect the gauge circuit. Avoid using an impact wrench on the mounting screws to prevent over-tightening damage.
Tighten screws to the manufacturer’s torque spec, avoiding over-tightening to prevent stud damage. Use a 22mm wrench for sensor fittings, snugging them between 10-15 ft-lbs.
Reinstall original screws if applicable, secure excess wiring with zip ties near the backclamp, and apply thread tape on adjacent fittings. Confirm metal-to-metal contact for grounding and protect harness routing with a grommet to guarantee a secure, stable installation.
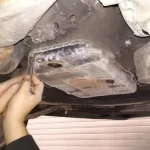
Start by ensuring your safety: wear safety glasses and disconnect the negative battery cable before proceeding. Raise and support the vehicle securely with jack stands, engage the parking brake, and chock the rear wheels.
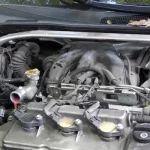
Locate the OEM oil pressure sender, which may require removing the engine cover or alternator bracket for better access.
Follow these steps to remove the sender:
After removal, consider using a mechanical gauge to check the actual oil pressure for accurate diagnosis.
Select the appropriate adapter to match your engine block’s thread size and the sender’s requirements before installation. The sensor is typically installed in a sandwich plate or replaces the factory oil pressure switch to avoid running a mechanical oil line inside the vehicle.
Using the correct adapter also ensures compatibility with your vehicle’s oil system. Apply Teflon putty to the adapter’s male threads, then screw it into the block using a ratchet and extension if necessary.
Tighten the 17mm nut firmly, avoiding hand tightening. Position the adapter’s top port upward for best routing. Next, install the T-fitting if used, allowing connection of the sender, factory switch, and tubing.
| Component | Thread Size | Tool Needed |
|---|---|---|
| Adapter | 3/8” NPT to 1/8” NPT | 17mm wrench |
| Oil Pressure Sender | 1/8” NPT | Channel locks |
| T-Fitting | 1/8” NPT ports | Adjustable wrench |
| Brass Bush Adaptor | Varies (block) | Ratchet |
Ensure no cross-threading or leaks before proceeding. Proper sealing with Teflon tape on sensor threads helps prevent oil leaks after installation.
Slide the hex nut and ferrule onto the tubing before inserting it, ensuring you uncoil a few feet for easier handling.
Use nylon pressure line sheathed in clear plastic tubing, cut to length with open ends intact. Proper oil pump shaft alignment is critical to avoid damage during installation.
Insert the tubing fully into the compression fitting, then push the ferrule and tighten the nut securely without thread sealant. Remote mounting the sender via a braided hose reduces vibration.
Next, route the tubing carefully:
Several key electrical connections must be made correctly when wiring your oil pressure gauge to guarantee accurate readings and prevent damage. First, connect the sender terminal (S) on the gauge to the oil pressure sender using an 18-gauge twin conductor wire.
Attach the center ground terminal (GND) directly to a solid engine ground near the sender to assure proper sensor grounding. It is important to ensure the sensor ground is correctly identified, typically the middle pin on a three-pin oil pressure sensor, to maintain proper sensor grounding.
Connect the ignition wire (I) from the ignition switch, typically a red wire supplying 12V+, to the gauge’s ignition terminal. Regular maintenance and inspections can help identify if the faulty oil pressure sensor is causing inaccurate gauge readings.
Avoid applying power to the sender terminal, as this will damage the sender unit. Ground the black wire to the vehicle’s chassis or battery negative. Always disconnect the battery’s negative cable before wiring, and verify connections with a multimeter to confirm correct voltage and continuity before reassembly.
Before finalizing the assembly, you’ll need to conduct thorough leak testing to guarantee system integrity. Begin by pressurizing the system with dry air or use low-pressure smoke to visualize leaks.
Monitor pressure decay or rise over a set period to quantify leak rates. A pressure rise test can be particularly effective, as it measures the time taken for a pressure increase, helping differentiate leaks from outgassing effects.
Carefully inspect all connections for oil drips or bubble formation if submerged. Once leak-free, proceed to finalize the installation.
You can use an oil pressure gauge on most engines, but it must match the sender’s resistance and pressure range for accurate readings. Different engines, like Ford, Porsche, or Chevy, require specific senders or adapters.
Mechanical gauges connect directly to oil lines, while electric gauges need compatible sensors. Always verify your engine’s specifications and make certain the gauge and sender are compatible to avoid inaccurate or faulty readings.
You interpret oil pressure gauge readings by monitoring the needle position against the dial’s PSI or Bar units.
A steady needle within the green zone or manufacturer’s specified range means normal operation, typically 20-60 PSI depending on engine temperature.
Readings below 20 PSI or above 60 PSI indicate potential issues like low oil, leaks, or blockages. Pay attention to sudden drops or spikes, as they signal urgent maintenance needs.
You’ll notice a faulty oil pressure gauge if the needle sticks at one end, shows erratic or constant values like 0 or 80 PSI, or fluctuates wildly.
Warning lights on your dashboard, such as the oil pressure or check engine light, may illuminate falsely.
Oil leaks near the sensor or physical damage like corrosion or loose connections can also cause inaccurate readings.
Always inspect these issues promptly for safety and accuracy.
Yes, an oil pressure gauge can help prevent engine damage by giving you real-time monitoring of your engine’s oil pressure.
When the needle drops below safe levels, you’ll catch issues early, such as low oil or clogged filters, before components suffer wear or overheating.
However, you must stay attentive to the gauge and maintain sensor accuracy for it to work effectively as an early warning tool.
You should calibrate your oil pressure gauge every 12 months for standard use, but verify it twice a year if conditions vary.
Shorten intervals under unstable processes or harsh environments.
Perform Level 1 maintenance quarterly; check zero return and flush traps.
Annually, conduct Level 2 maintenance by disassembling for thorough verification and sealing.
Always recalibrate immediately if the pointer drifts from zero or shows erratic readings.
Regular checks guarantee reliable performance.
By following these precise steps, you’ll have your oil pressure gauge installed like clockwork, ensuring accurate readings and engine safety. Remember, rushing through wiring or fittings is like building a house on sand; unstable and risky.
Double-check all connections, test for leaks thoroughly, and secure every component firmly. With proper installation, your gauge will be a reliable sentinel, keeping you informed and your engine protected every mile you drive.