Physical Address
304 North Cardinal St.
Dorchester Center, MA 02124
Physical Address
304 North Cardinal St.
Dorchester Center, MA 02124

To quiet rear differential noise, start by checking the fluid level and condition. Top off or replace gear oil if dirty or low. Use diagnostic tools like chassis ears to locate specific noise sources. Inspect for worn bearings, damaged gears, or improper pinion preload.
Adjust settings with proper tools to prevent gear slippage or bearing failure. Fix leaks and make certain alignment and backlash are within specs. Follow these steps to restore smooth, quiet differential operation and avoid costly repairs.
Details on procedures and preventive care await your review.
When you hear whining or whirring noises during acceleration, it usually indicates failing gears or bearings within the rear differential.
Pay close attention: howling or whining during deceleration typically signals a loose ring and pinion gear.
Howling or whining sounds during deceleration often indicate a loose ring and pinion gear in the differential.
If you notice clunking or clicking sounds while turning, worn spider or side gears are likely the cause. Rumbling noises above 20 mph often point to worn carrier bearings.
Grinding or persistent howling at high speeds suggests overall differential wear. By recognizing these distinct sounds, you can pinpoint specific component failures early.
This awareness helps you address issues promptly, avoiding further damage and costly repairs. Always correlate noise patterns with driving conditions to accurately identify the root cause within your rear differential system.
Unusual odors from the gear oil can also be an indicator of overheating or contamination within the differential, which may contribute to noise and component failure, so monitoring gear oil condition is important.
Accurately identifying rear differential noise requires more than just listening; employing diagnostic tools enhances your ability to isolate the exact source.
Start by using chassis ear microphones to capture precise noise locations around the differential as you drive. Next, monitor vibration intensity during acceleration and turns to correlate symptoms with mechanical issues.
Finally, observe how the noise changes between accelerating and decelerating to pinpoint failing gears or bearings.
Use vibration analyzers to detect irregular intensity spikes. Employ chassis ears for real-time noise localization. Compare noise characteristics during varied driving conditions.
These tools provide objective data, allowing you to differentiate differential noise from wheel bearings or driveshaft issues. This ensures targeted repairs and prevents misdiagnosis.
Additionally, regularly inspecting for oil leaks around the differential can help identify sources of noise and prevent further damage.
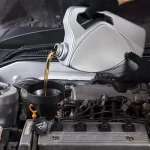
Regularly checking your rear differential fluid levels and condition plays a critical role in preventing component wear and overheating.
Begin by locating the differential fill plug, typically on the rear of the housing. Remove the plug and inspect fluid level using a finger or suitable tool; it should be near the fill hole’s bottom edge.
If low, add manufacturer-recommended gear oil until it slightly overflows. Next, assess fluid condition—look for discoloration, metal particles, or a burnt smell indicating contamination or degradation.
Dark, gritty, or foul-smelling fluid requires complete replacement. Use a proper fluid type and maintain intervals per your vehicle’s service manual.
Neglecting this step risks insufficient lubrication, causing whining noises and premature bearing or gear failure within the differential assembly.
Most experts recommend using 85w-140 gear oil for towing and heavy-duty applications to provide optimal protection and prevent wear.
Keep an eye out for leaks and signs of overheating around the rear differential, as these issues directly impact lubrication and component longevity. Inspect the differential housing and axle seals for fresh oil residue or wetness, which indicates leaks.
Overheating often manifests as discoloration on the housing or a burnt smell from the differential fluid. Address these promptly to prevent further damage.
Focus on these key checks:
Using differential fluids with proper temperature performance helps prevent overheating and extends component life.

Listen carefully for rumbling noises that grow louder as you accelerate beyond 20 mph. This often signals worn carrier bearings in the rear differential.
To diagnose, first secure the vehicle and remove the differential cover to inspect bearing surfaces for scoring or metal debris. Rotate the carrier while feeling for roughness or play, indicating bearing wear or damage.
Use a dial indicator to measure any axial or radial endplay exceeding manufacturer specifications. Additionally, check for discoloration or overheating signs on bearings, which point to lubrication failure.
Employ chassis ear microphones near the differential during a test drive to localize noise sources accurately. If you detect vibration or rumbling consistent with these symptoms, prepare to replace the worn bearings promptly to prevent further damage and restore quiet operation.
Before reassembly, clean the area thoroughly with a suitable cleaning solvent or degreaser to remove all residue and ensure proper sealing.
First things first, you’ll want to check the gear mesh pattern. This step is crucial because it ensures that the pinion and ring gear are engaging properly. If they’re not aligned just right, you could run into issues down the line.
Once you’ve got that sorted, the next step is to measure and adjust the pinion bearing preload. This is really important! You want to avoid any excessive play or binding, which can lead to bigger problems. So, take your time with this part.
Regularly inspecting and changing your gear oil according to recommended change intervals can help maintain proper gear engagement and reduce noise.
When checking the gear mesh pattern, focus on the alignment and preload of the pinion and ring gears to guarantee proper engagement.
Begin by applying gear marking compound to the ring gear teeth. Then rotate the assembly to observe the contact pattern. A centered, consistent pattern confirms correct mesh; off-center or edge contact indicates misalignment.
Also, verify the backlash between gears falls within manufacturer specs to avoid excessive play or binding. Key points to inspect include:
Adjustments here prevent noise caused by improper gear engagement and extend differential life. Additionally, using gear oil with the correct viscosity and specification is critical to maintaining smooth gear operation and preventing premature wear.
Although proper gear mesh is essential, adjusting the pinion bearing preload guarantees the pinion gear maintains correct contact pressure with the ring gear.
Begin by loosening the pinion nut and removing the driveshaft to access the pinion bearings. Use a torque wrench to tighten the pinion nut incrementally, measuring rotational torque with a preload gauge.
Aim for the manufacturer’s specified preload; too low causes gear slippage and noise, while too high leads to bearing failure. After setting preload, verify the pinion depth and backlash remain within specs to ensure proper ring and pinion alignment.
Finally, reinstall components and check for smooth rotation without excessive play. Precise preload adjustment minimizes differential noise and extends bearing life, so take care during this critical step. Regular maintenance and monitoring of the bearing preload can prevent premature wear and costly repairs.
Listen carefully for clunking or clicking noises during turns, as these often indicate broken spider or side gears inside the differential. To confirm this, monitor your vehicle’s behavior closely.
You should check for consistent clunks every few feet while cornering, signaling gear damage. Use chassis ears or similar diagnostic tools to isolate the noise source inside the differential housing.
Observe if the noise persists or worsens when steering at low speeds, focusing on differential engagement. If you detect these signs, the spider or side gears likely suffer from wear or breakage.
Avoid driving aggressively until inspection, as further damage may occur. Your next step is to disassemble the differential carefully to inspect the spider and side gears for cracks, missing teeth, or deformation, confirming the diagnosis before proceeding with repairs.
In cases of persistent noise and damage, it is crucial to understand that driving further risks catastrophic failure and should be avoided until repairs are completed.
To tackle common rear differential problems, the first step is to check and maintain the differential fluid. This is crucial because proper lubrication can help prevent overheating. Don’t skip this part; it’s essential for keeping everything running smoothly!
Once you’ve taken care of the fluid, it’s time to inspect the bearings. Look for any signs of wear or damage—if you notice anything off, it’s best to replace them, especially if they’re causing noise or vibration. Trust me, you want to address these issues before they escalate!
Lastly, let’s talk about gear alignment. Make sure everything is aligned correctly, and if you find any worn gears, you’ll need to repair or replace them. This will help restore smooth operation and eliminate those annoying abnormal sounds that can drive you crazy.
So, keep an eye on these components for a well-functioning rear differential! It’s also important to use the correct differential fluid viscosity to minimize wear and ensure smooth operation under high heat and friction.
Maintaining proper differential fluid levels is essential for preventing overheating and premature wear of rear differential components. You should check the fluid regularly for contamination and top it off with the manufacturer-recommended type.
Neglecting fluid maintenance leads to lubrication failure, causing noise and damage. Follow these steps to maintain your differential fluid:
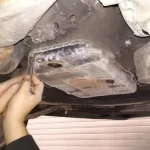
Start by thoroughly inspecting the rear differential bearings for signs of wear or damage. These components play a pivotal role in smooth gear operation and noise reduction.
Remove the differential cover and drain the fluid to access the bearings. Check for pitting, scoring, or discoloration on the bearing surfaces, which indicate excessive wear or overheating.
Rotate the bearings manually to detect roughness or binding. Use a dial indicator to measure bearing play against manufacturer specifications.
If you find any abnormalities, replace the bearings promptly to prevent further damage. Make certain you press the new bearings accurately onto the shaft without applying force to the inner race.
After replacement, apply fresh differential fluid and reassemble the unit. Verify that the bearings spin freely without noise or resistance.
Aligning and repairing rear differential gears demands meticulous attention to gear mesh patterns and pinion preload settings.
You must first remove the differential cover, drain the fluid, and inspect the ring and pinion gears for wear or damage. Use gear marking compound to check the mesh pattern, ensuring the contact area is centered and uniform.
Adjust shims or crush sleeves to set proper pinion bearing preload, preventing noise and premature wear. When you replace damaged gears, always verify backlash and torque specifications.
Key steps include:
Precise alignment reduces whining and extends differential life.
Because differential noise often stems from wear and lubrication issues, you should regularly check and maintain proper fluid levels to prevent overheating and component damage.
Inspect the differential fluid at recommended intervals, replacing it with manufacturer-specified gear oil to guarantee peak viscosity and lubrication properties.
Regularly examine seals and gaskets for leaks that can reduce fluid levels and introduce contaminants. Monitor for unusual vibrations or noises during acceleration and turns, addressing abnormalities promptly.
Keep the rear differential clean and avoid overloading your vehicle, as excess stress accelerates wear on gears and bearings. Proper maintenance also includes adjusting pinion preload and gear alignment when necessary.
Yes, rear differential noise can contribute to poor fuel efficiency.
When components like gears or bearings wear out or fluid levels drop, they create extra friction and resistance.
This forces your engine to work harder to maintain speed, consuming more fuel.
To improve efficiency, inspect and address worn parts, verify proper lubrication, and fix leaks promptly.
Maintaining your differential reduces drag and keeps your fuel consumption at its best.
You wouldn’t take your horse-drawn carriage down a busy highway.
Similarly, it’s not safe to drive with a noisy rear differential. That whining or clunking signals worn gears or bearings, which can fail unexpectedly.
Continuing to drive risks further damage and potential breakdowns.
You should inspect fluid levels, listen for noise changes during acceleration and turns, and get repairs done promptly to guarantee safe, reliable operation.
A rear differential repair typically takes between 3 to 6 hours, depending on the damage extent.
If you’re just replacing fluid or bearings, expect closer to 3 hours.
More complex repairs like replacing gears or fixing broken spider gears can extend to 5 or 6 hours.
Always factor in inspection time and potential alignment adjustments.
Scheduling in advance guarantees you’ll have your vehicle back promptly without surprises.
Adding aftermarket parts can reduce rear differential noise if you choose high-quality components designed to improve gear meshing and bearing performance.
You’ll want parts that match your differential’s specifications precisely to avoid misalignment or increased vibration. Avoid generic or low-grade parts, as they might worsen noise or cause premature wear.
Always make certain proper installation, correct preload, and adequate lubrication to achieve quieter operation effectively.
Yes, cold weather can increase rear differential noise because low temperatures thicken differential fluid, reducing its ability to lubricate gears and bearings effectively.
You might notice whining or whirring sounds during acceleration as the fluid struggles to circulate.
To minimize noise, warm up the vehicle before driving and consider using synthetic differential fluid with a lower viscosity rating designed for cold climates to maintain proper lubrication and reduce gear wear.
Now that you know how to identify and fix rear differential noise, will you let a small issue turn into costly damage? By regularly checking fluid levels, inspecting bearings and gears, and ensuring proper alignment, you can keep your differential running smoothly.
Don’t ignore early signs like leaks or unusual sounds; address them promptly with the right tools and techniques. Consistent maintenance isn’t just smart; it’s essential for quiet, reliable performance.