Physical Address
304 North Cardinal St.
Dorchester Center, MA 02124
Physical Address
304 North Cardinal St.
Dorchester Center, MA 02124
To bleed your ABS modulator, start by securely parking the vehicle, wearing protective gear, and ensuring the ignition is ON.
Manually bleed each wheel in the correct sequence, maintaining master cylinder fluid above half full and preventing air re-entry with clear tubing.
Use a bi-directional scan tool to cycle ABS valves under system pressure, then bleed isolation valves and depressurize the accumulator.
Confirm pedal firmness and no air remains before road testing. Following these steps carefully guarantees proper ABS function and safety; further details clarify each phase.

Before you begin bleeding the ABS modulator, make certain your vehicle is securely parked with the ignition off and the parking brake engaged.
Ensure your vehicle is safely parked with the ignition off and parking brake engaged before starting ABS bleeding.
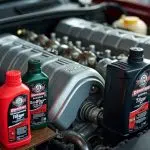
Next, verify the master cylinder reservoir is filled with fresh DOT 3 brake fluid and maintain it above the halfway mark throughout the procedure.
Prepare a container with brake fluid for catching expelled air and fluid.
Use clear tubing slid over each bleeder nipple to prevent air re-entry.
Have a bi-directional scan tool ready, as modern ABS systems require specific ABS cycling functions for effective bleeding.
Confirm you have a helper to apply firm, consistent brake pedal pressure during manual bleeding.
Finally, confirm all necessary tools are within reach to maintain workflow efficiency during the multi-step ABS modulator bleeding process.
Ensure you also monitor for any unusual vibrations or noises during braking that could indicate ABS or differential issues needing attention.
With your vehicle prepped and tools ready, you’ll begin manual brake line bleeding to expel the majority of trapped air from the system.
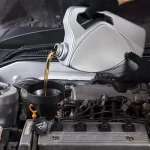
Start by filling the master cylinder reservoir with fresh DOT 3 brake fluid, keeping it above half full throughout.
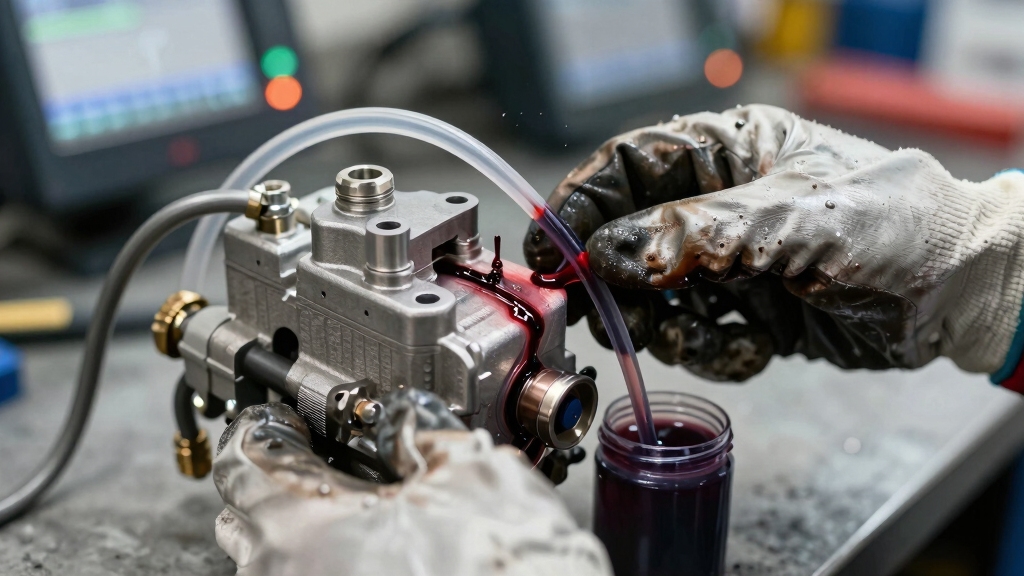
Follow the recommended sequence: right rear, left rear, right front, then left front. Attach clear tubing over the bleeder nipple and submerge it in a container with brake fluid. Crack the bleeder screw approximately ¼ turn.
Have a helper apply firm pressure to the brake pedal steadily, allowing fluid and air to flow out until clear. Close the bleeder screw before releasing the pedal to prevent air re-entry.
Maintain this process carefully for each wheel, ensuring the system is as free of air as possible before advancing to ABS modulator-specific procedures.
It is important to wear safety gloves and goggles during this process to protect against brake fluid irritation and toxicity.
Connect a bi-directional scan tool equipped with ABS-specific functions to your vehicle’s diagnostic port to initiate the modulator valve cycling procedure.
Make sure the system is pressurized to 35 psi with the ignition on before starting. Access the scan tool’s ABS menu, usually under “Special Functions → ABS Bleeding,” then select the automatic bleed procedure.
This energizes and cycles the brake pressure modulating valve (BPMV) solenoids for one minute.
Next, follow prompts to bleed each wheel individually while the pump runs and release valves cycle for one minute per wheel.
Finally, the scan tool commands a 20-second solenoid cycling to purge residual air.
Key steps include:
For reliable diagnostics and system integrity, it is important to use a professional-grade scanner capable of accessing live data and controlling solenoids during the procedure.
After completing the ABS modulator valve cycling using the scan tool, focus shifts to bleeding the isolation valves and accumulator to remove any remaining air pockets.
Start by opening the bleeder screw closest to the engine on the isolation valve while the ignition is on and the brake pedal is lightly pressed. Allow fluid to flow until clear.
Next, depressurize the accumulator by pumping the brake pedal 40 times with the ignition off. Wait two minutes for fluid de-aeration before refilling the reservoir.
Proper bleeding ensures the removal of trapped air, which can impair the hydraulic system performance.
| Step | Action | Notes |
|---|---|---|
| 1 | Open engine-side bleeder screw | Ignition on, light pedal pressure |
| 2 | Bleed until clear fluid | Continuous fluid flow required |
| 3 | Pump brake pedal 40x | Ignition off |
| 4 | Wait 2 minutes | Fluid de-aerates |
| 5 | Refill reservoir | Maintain fluid level |
Although you’ve already addressed the isolation valves and accumulator, bleeding the ABS modulator boost section demands a distinct procedure to guarantee complete air removal. This step ensures the boost chamber is free of trapped air that can compromise brake performance.
You’ll need to cycle the ignition and apply controlled brake pedal pressure systematically.
Follow these steps precisely:
Apply moderate brake pedal pressure.
Cycle the ignition on for 3 seconds, then off; repeat this 10 times.
Maintain brake pedal pressure while closing bleeder screwserto avoid air re-entry.
Monitor fluid flow clarity and pedal feel throughout the process.
Completing this procedure thoroughly eliminates residual air in the boost section, preparing the ABS system for reliable operation under pressure. Proper bleeding procedures ensure effective brake system performance and safety.
Verify brake pedal firmness immediately after completing the bleeding procedure to guarantee no air remains in the system and hydraulic pressure is fully restored.
First, apply steady pressure to the brake pedal and observe its resistance. A firm pedal shouldn’t sink to the floor or feel spongy.
If the pedal feels soft or inconsistent, additional bleeding may be necessary to remove trapped air.
Next, hold firm pressure on the pedal while closing bleeder screws to prevent air re-entry.
Repeat this process for each wheel and modulator isolation valve as needed.
Finally, perform a controlled brake application during engine off and ignition on cycles to confirm consistent pedal firmness.
Only once the pedal exhibits a solid, unyielding feel can you proceed with road testing the vehicle.
For optimal brake performance and to ensure the hydraulic system is free from air bubbles, consider performing a brake flush if repeated bleeding does not restore firmness.
When you perform a thorough ABS modulator fluid flush, you guarantee that all internal passages and chambers within the ABS unit are fully cleared of old brake fluid and trapped air. This exhaustive procedure ensures the longevity and reliability of the braking system by flushing fluid trapped in hard-to-reach modulator areas.
Begin with a manual brake line bleed to remove most air. Next, use a bi-directional scan tool to cycle ABS solenoids and valves, flushing internal passages. Follow this by bleeding the isolation valves and accumulator to clear residual air pockets. Finally, verify boost section fluid flow and pedal firmness.
Key steps include:
Proper maintenance and timely fluid flushing help prevent seals and gaskets from deteriorating and causing leaks in the braking system.
If you find yourself dealing with air trapped in the ABS modulator, just doing a standard bleed mightn’t cut it. Sometimes, you’ll need to use a scan tool to help cycle the solenoids. Keep in mind that you might run into some hiccups, like trouble connecting to the scan tool or software issues that could throw a wrench in the automatic bleeding process.
Also, it’s super important to maintain consistent brake pedal pressure while you’re bleeding the system. This helps prevent any air from sneaking back in.
And don’t forget to double-check that the fluid is flowing properly throughout the whole system. It’s all about making sure everything is working smoothly!
Proper handling and disposal of automotive fluids and components, such as using leak-proof containers, is crucial to prevent environmental contamination during maintenance tasks.
Although standard manual bleeding removes most air, trapped air within ABS modulator valves often requires targeted troubleshooting to fully purge.
To tackle air trapping effectively, you must focus on specific system components and procedures beyond basic bleeding.
Start by cycling the ABS modulator solenoids using a bi-directional scan tool to open internal passages. Next, bleed the isolation valves systematically, ensuring ignition is on and light brake pedal pressure is applied.
After depressurizing the accumulator, wait two minutes for fluid de-aeration before refilling the reservoir. Finally, verify pedal firmness and perform a controlled road test to confirm air removal.
Proper maintenance of seals and fittings is essential to prevent fluid leaks and ensure system reliability during ABS modulator bleeding.
Why does the ABS modulator bleeding process sometimes stall despite following prescribed procedures?
Often, scan tool challenges stem from improper tool selection or connectivity issues. You must make certain your scan tool supports the exact ABS model, like Bosch ABS5.3 or Delphi DBC7, and that it communicates fully with the vehicle’s ABS module.
Incomplete or intermittent data link connections can interrupt solenoid cycling, leaving trapped air unpurged.
Additionally, failure to maintain system pressure above 35 psi before initiating the automatic bleed procedure can cause the process to halt.
Verify ignition status and brake fluid levels to avoid errors. If the scan tool’s prompts don’t align with valve responses, recalibrate or update software.
Methodically confirm each step before proceeding, as skipping these checks compromises the entire bleeding sequence.
Proper safety measures, including disconnecting the battery and wearing personal protective equipment, are essential before starting any bleeding or diagnostic procedures.
Monitor brake pedal pressure closely during ABS modulator bleeding to identify inconsistencies that indicate trapped air or system leaks. If the pedal feels spongy, soft, or sinks slowly, it often signals air trapped within the modulator or a leak in the hydraulic circuit. You must address these issues promptly to restore proper braking performance.
Focus on these troubleshooting steps:
Confirm the master cylinder reservoir fluid level remains above halfway during bleeding. Use the scan tool’s ABS cycling function to purge internal modulator chambers. Check bleeder screws for tightness and absence of leaks during pedal application. Make sure pedal firmness improves progressively after each bleeding phase before concluding.
Once you complete the ABS modulator bleeding procedure, you need to confirm the system’s functionality through a controlled road test. Begin by guaranteeing the brake pedal feels firm and consistent under moderate pressure.
Start by ensuring the brake pedal is firm and consistent with moderate pressure.
Monitor the ABS warning light for any faults during ignition and initial driving. Conduct slow-speed tests on a safe, low-traction surface to activate the ABS system by performing controlled hard braking.
This engages the internal modulator valves and pump, verifying proper cycling and fluid flow. Confirm that no pulsation irregularities or warning signals occur during ABS activation. Finally, inspect for any fluid leaks or pedal softness post-test.
This methodical confirmation assures the ABS modulator is free of air and fully operational, maintaining peak braking performance and safety.
Yes, you can use DOT 4 fluid instead of DOT 3 for ABS bleeding, as DOT 4 has a higher boiling point and is compatible with systems designed for DOT 3.
However, you must never mix DOT 4 with DOT 5 silicone fluid. Before switching, drain the old fluid completely to avoid contamination.
Always verify your vehicle manufacturer’s specifications to confirm compatibility and maintain peak brake system performance and safety.
You should perform ABS modulator bleeding primarily when you replace brake fluid or detect air in the system after repairs.
Routine bleeding isn’t typically scheduled but is essential whenever the brake fluid is changed or ABS components are serviced.
Frequent bleeding without cause isn’t necessary, as it involves complex procedures using scan tools.
Regular brake fluid replacement intervals, usually every 2 years, serve as your maintenance guide for ABS modulator bleeding.
No, ABS warning lights won’t reset automatically after bleeding. You’ll need to use a bi-directional scan tool with ABS-specific functions to clear any stored fault codes and reset the light.
Simply completing the bleeding procedure doesn’t erase error codes in the ABS control module. Make sure you perform the ABS bleeding and then run the scan tool’s reset function to verify the system registers no faults and the warning light turns off properly.
You generally can’t effectively bleed an ABS modulator without a helper.
The process requires one person to apply steady brake pedal pressure while you open and close bleeder screws in sequence.
However, if you use a bi-directional scan tool with automatic bleed functions, you might perform it solo since the tool cycles the ABS valves and pump.
Still, having assistance guarantees proper fluid flow and prevents air from re-entering during screw closure.
Like accessing a new code, bleeding ABS modulators in electric vehicles involves extra steps. You’ll find the process similar but must account for high-voltage systems and electronic controls.
Use EV-specific scan tools to cycle ABS solenoids safely, ensuring no electrical interference. Always follow manufacturer protocols to avoid damaging sensitive components.
Bleeding your ABS modulator demands preparation, precision, and patience. You’ll prepare your vehicle and tools, manually bleed brake lines, and cycle the modulator valves with a scan tool.
Next, methodically address isolation valves, accumulators, and the boost section. Then, confirm pedal firmness, perform a fluid flush if needed, troubleshoot issues, and verify function through road testing.
By following these steps consistently, you guarantee safety, restore peak braking performance, and maintain system reliability.