Physical Address
304 North Cardinal St.
Dorchester Center, MA 02124
Physical Address
304 North Cardinal St.
Dorchester Center, MA 02124

You can tell your radiator cap is bad if you notice coolant leaks or dried residue around the cap or radiator neck, a cracked or hardened rubber seal, or a rusty, unresponsive spring that fails to maintain system pressure.
Also, watch for engine overheating or temperature spikes, bulging radiator hoses, and steam emissions. These signs indicate the cap isn’t sealing properly, risking coolant boiling and system damage. To fully grasp prevention and exact checks, keep exploring the topic.
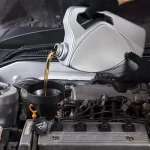
When you notice coolant leakage around the radiator cap, it often signals a failure in maintaining proper system pressure. Check for visible wet coolant or dried residue, white or light green streaks, around the cap or radiator neck. Using the correct coolant maintenance practices can help prevent such leaks.
Leaks may originate from damaged seals inside the cap, not just the external edge. Overflowing coolant near the reservoir can also indicate premature pressure release caused by a faulty cap.
Inspect for steam emissions when the engine heats up, which suggests escaping gas due to pressurization issues. Corrosion or discoloration on the radiator neck or cap surface further confirms leakage.
These signs point to compromised sealing or pressure regulation, critical for maintaining coolant flow and preventing overheating. Coolant levels drop as a result of these leaks, increasing the risk of engine overheating and damage.
Although the radiator cap plays a crucial role in maintaining system pressure, examining the condition of radiator hoses is equally important for diagnosing pressure issues. Look for bulging, hardness, cracks, or collapsed sections, which often indicate pressure imbalances caused by a faulty cap or blockages.
A common cause of swollen and hard hoses is excessive pressure in the cooling system, which may signal a malfunction like a stuck thermostat or combustion leakage. Leaks or loose connections also reduce pressure, impairing cooling efficiency.
Understand how engine wear protection technologies in motor oils can influence engine temperature and pressure management. Use the table below to assess common hose conditions linked to pressure problems:
| Hose Condition | Symptoms | Pressure Effect |
|---|---|---|
| Bulging/Hard | Swelling, rigidity | Excessive pressure buildup |
| Cracks/Splits | Visible damage, leaks | Pressure loss, coolant leakage |
| Collapsed Hose | Flattened sections | Vacuum buildup, restricted flow |
| Leaks/Loose Ends | Coolant escape, loose clamps | Pressure drop, inefficient cooling |
| Internal Blockage | Reduced diameter | Flow resistance, pressure changes |
You need to watch for early signs of overheating, like the temperature gauge rising toward or into the red zone. Fluctuations or consistently high readings on the gauge often indicate pressure or cooling system failures linked to a faulty radiator cap.
Most gauges stay centered when the engine is fully warmed, so a needle creeping into the red zone is a clear overheating indicator. Addressing these irregularities promptly helps prevent severe engine damage. Monitoring the cooling system helps maintain optimal transmission temperature and prevents related component failures.
If your engine starts emitting steam or unusual smells, these are critical early indicators that overheating is occurring. Steam typically signals boiling coolant escaping the system, requiring immediate shutdown and cooling before inspection.
Radiator fluid boils between 223°F and 235°F, which is higher than normal engine operating temperatures. Some advanced motor oils, such as those with Synerlec Additive Technology, can help reduce engine friction and heat buildup.
A sweet odor often means coolant leakage, while burning rubber or hot oil smells point to overheated belts or oil contacting hot surfaces. Listen for increased engine ticking or knocking; thinning oil reduces lubrication, causing metal-to-metal contact that accelerates wear. Over time, this lack of proper lubrication can cause engine damage to worsen rapidly.
Also, watch for coolant leaks around the radiator or hoses, as these lower coolant levels and impair heat regulation. Early power loss or sluggish acceleration can indicate rising engine temperature affecting performance.
Steam or unusual odors signaling early overheating often coincide with erratic behavior in the temperature gauge, which offers a direct visual cue of the engine’s thermal state.
The temperature gauge monitors engine temperature in real-time on the dashboard, providing immediate feedback if the engine is running too hot or too cold. Fluctuations typically indicate coolant issues, thermostat malfunctions, or blockages in the radiator and hoses.
Using the appropriate brake fluid type can also impact overall engine performance and safety. You should pay close attention if you notice:
Addressing these requires inspecting coolant levels, testing the thermostat, and ensuring the radiator and hoses are clear. Prompt maintenance prevents engine damage caused by thermal expansion and contraction due to unstable temperatures reflected by the gauge.
Because the cooling system pressure directly influences the boiling point of the coolant, maintaining proper pressure is essential to guarantee engine overheating and ensure efficient temperature regulation.
Your radiator cap seals the system, holding pressure typically around 15 psi, which raises the coolant’s boiling temperature and prevents premature vaporization. Using the correct radiator cap material is important, as some caps may deteriorate faster when exposed to chlorinated chemicals.
If pressure exceeds limits due to thermostat blockages, gasket failures, or restricted flow, hoses may swell or burst, and the radiator can crack. Excess pressure also disrupts coolant circulation, risking overheating and component damage.
A faulty radiator cap can’t maintain pressure, causing early boiling and loss of cooling efficiency. Regularly checking the coolant level ensures there is enough fluid to absorb heat and maintain system pressure, as insufficient coolant can lead to overheating and increased pressure.
Understanding this pressure balance helps you recognize when your cap or system parts are compromised and prevents costly engine damage by ensuring coolant remains under controlled pressure for ideal heat transfer.
When your cooling system starts showing signs of diminished performance, pinpointing the exact problem becomes critical to preventing engine damage. You need to watch for these key indicators:
Start by closely examining the radiator cap’s surface for cracks, corrosion, or physical deformities that could compromise its function. Understanding the foam resistance of fluids in the cooling system can help identify potential cap-related issues.
Next, check the rubber seal for dryness, brittleness, or damage that would prevent a proper airtight seal. These detailed visual and tactile inspections are essential to identify early signs of cap failure before pressure testing.
Regularly performing a visual inspection helps detect issues like cracks or corrosion that may lead to cooling system problems.
Although the radiator cap may appear simple, inspecting its surface condition is essential for ensuring proper sealing and pressure regulation. Start by checking for corrosion or rust on metal parts, which compromises structural integrity and sealing.
Next, look for physical damage such as cracks, dents, or warping that can prevent a tight seal. Since improper sealing can affect overall engine performance, understand how a proper fitment plays a role in maintaining system integrity.
Finally, evaluate the cleanliness of oil, dirt, or debris on the cap surface hinders proper seating and pressure control.
To further ensure safety during inspection, always make sure the engine coolant is cooled before removing the radiator cap to prevent injury. Regularly assessing these conditions helps you maintain a reliable cooling system and avoid overheating issues.
Because the radiator cap’s seal is critical for maintaining system pressure, you should carefully inspect both the rubber seal and spring mechanism for signs of wear or damage. Examine the rubber seal on the underside for cracks, brittleness, or deformation that could prevent a tight seal.
Check for embedded dirt or corrosion, which compromises integrity. Press the seal to assess flexibility; it should be pliable, not stiff. Also, inspect the metal spring for rust and ensure it compresses smoothly, returning without slack.
Confirm the sealing surface is free from dents or warping. Any hardening or deformation reduces sealing ability, risking coolant leaks. Regular checks help prevent cooling system disasters. Choosing high-quality components with enhanced sealing technology can improve long-term reliability.
Performing these visual and physical inspections helps ensure the cap maintains proper pressure, preventing overheating and system failure.
You should replace your radiator cap every 4 to 5 years as a preventive measure or around 100,000 miles due to wear from heat and pressure. Inspect it annually, especially during coolant flushes or radiator replacements.
If you notice leaks, corrosion, or pressure loss, replace it immediately. Always use a high-quality cap matching your vehicle’s specs to maintain cooling system integrity and prevent overheating or engine damage.
Yes, a bad radiator cap can cause your heater to stop working. It fails to maintain the proper pressure in the cooling system, reducing coolant circulation through the heater core. This leads to lower heat transfer and lukewarm or cold air from your heater.
Additionally, coolant leaks or air entering the system due to a faulty cap disrupts flow, causing overheating and inconsistent engine temperature, which further impairs heater performance.
Temporarily tolerating a faulty radiator cap is technically tenable, but tread carefully. You’ll risk rapid radiator ruptures, reduced reservoir regulation, and rising temperatures, risking thermal trauma.
Driving demands dependable cooling; a defective cap disrupts pressure, permitting coolant loss and overheating. Limit your lag time before a timely technical replacement.
Always avoid opening the cap when hot to prevent pressure-prompted perils. Prioritize prompt professional repair to preserve proper performance and prevent pricey problems.
For high-performance engines, you want a radiator cap rated between 26 to 30 psi to handle increased pressure and heat. These caps use heat-resistant materials and calibrated springs to maintain system pressure, prevent coolant boil-over, and improve cooling efficiency under extreme conditions.
Confirm the cap fits your radiator type precisely for a secure seal. Opt for durable, high-quality caps designed specifically for motorsport or aggressive driving environments to maximize engine reliability.
Imagine your engine as a finely tuned orchestra if the radiator cap fails, pressure drops, causing overheating and sensor confusion.
Yes, a bad radiator cap can trigger your check engine light by disrupting coolant pressure, allowing air pockets, or causing leaks. These issues upset engine temperature sensors, prompting diagnostic trouble codes.
By keeping a keen eye on coolant traces around the radiator cap and evaluating hose firmness, you can catch subtle signs of pressure misbehavior before they escalate. Noticing unusual engine warmth or temperature swings signals it’s time for a closer look.
Through careful visual and tactile checks, you’ll guarantee your cooling system functions effectively, avoiding unexpected hiccups. Staying proactive with these gentle reminders helps maintain your vehicle’s heartbeat in a smooth, reliable rhythm.